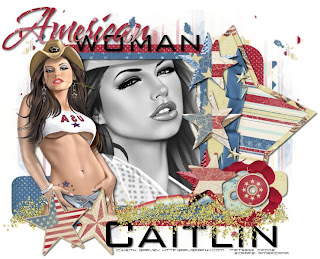
American Woman

Supplies Needed:
Tube of choice. I am using the stunning work of Keith Garvey. In order to use Keith's work you must obtain a license from MyPSPTubes.
Scrap Kit Americana by Dani Mogstad at Sweet Shoppe Designs.
Template 17 by Sara at Sinful Creations.
•Please make sure to leave Sara some love while downloading•
Vix Masks 101 and 109 from VixPSP.
•Please make sure to leave Vix some love while downloading •
Fonts of choice.
I used Waterbrush and Bank Gothic.
1. Open all supplies in PSP
2. Open a 700x650 canvas (we will resize later) and flood fill white.
3. Open Paper 5 - Copy - Paste as new layer - Image - Resize 15% smart size - Duplicate. On your first paper layer apply Vix Mask 101 - Right click mask layer - Merge group.
4. On your duplicated layer apply Vix Mask 109 - Right click mask layer - Merge group.
5. On Template 17 - Click on the Rectangle 4 layer - Copy - Paste as new layer - Selections - Select all Float - Defloat.
6. Open Solid Red Paper - Image - Resize 15% smart size - Copy - Paste as new layer - Selections - Invert Delete paper layer - Selections - Select none - Delete template rectangle.
7. On Template 17 - Click on the Rectangle 3layer - Copy - Paste as new layer - Selections - Select all Float - Defloat.
8. Open Paper 6 - Image - Resize 15% smart size - Copy - Paste as new layer - Selections - Invert Delete paper layer - Selections - Select none - Delete template rectangle.
9. On Template 17 - Click on Rectangle 2 layer - Copy - Paste as new layer - Selections - Select all Float - Defloat.
10. Open Solid Cream Paper - Image - Resize 15% smart size - Copy - Paste as new layer - Selections - Invert Delete paper layer - Selections - Select none - Delete template rectangle.
11. On Template 17 - Click on Rectangle 1 layer - Copy - Paste as new layer - Selections - Select all Float - Defloat.
12. Open Paper 3 - Image - Resize 15% smart size - Copy - Paste as new layer - Selections - Invert Delete paper layer - Selections - Select none - Delete template rectangle.
13. On Template 17 - Click on Rectangle Frame - Copy - Paste as new layer - Selections - Select all Float - Defloat.
14. Open Paper 11 - Image - Resize 15% smart size - Copy - Paste as new layer - Selections - Invert Delete paper layer - Selections - Select none - Delete template rectangle frame.
15. On Template 17 - Click on the Stars layer - Copy - Paste as new layer - Selections - Select all Float - Defloat.
16. Open the Chipboard Star in the embellishment folder - Image - Resize 55% smart size - Copy - Paste as new layer Selections - Invert - Delete paper layer - Selections - Select none - Delete template stars.
17. Open your Garv tube Close - Up and Paste as new layer - Move below the frame layer but above the rectangle 1 layer.
19. Grab your magic wand and click inside the frame layer - Selections - Modify - Expand by 3 - Selections - Invert - Delete your tube layer - Add a drop shadow to your frame layer.
20. X out all layers except your tube, frame and rectangle layer - Merge visible layers.
21. Now we're going to add the embellishments!
22. Open the Starstud Blue, Cream and Red Stars. Resize each of them by 15 % smart size. Paste one behind each of the stars in your template. I merged all star layers together once I was happy with the placement. I then added a slight dropshadow.
23. Open Page 10 from the ministar album. Image - Resize by 25% smart size - Copy - Paste as new layer - Image free rotate - Right 10 degrees - All layers unchecked - Move below your Star and Frame Layers.
24. Open the Thread bobbin2 and Thread bobbin1 - Image resize one of them by 20% smart size and the other 25%. Place to the bottom right of the tag and place as you wish.
25. Open Flower 1 - Image - Resize 15% smart size - Place behind the thread bobbins.
26. Open Ribbon 1 - Copy - Paste as new layer - Image - Resize 20% smart size - Rotate - Free rotate Left 10 degrees. Place at the bottom of your tag and have the right side behind the bobbins and flower.
27. Open the glitter - Copy - Paste as a new layer - Image - Resize 20% smart size - Adjust - Sharpen - Move to the bottom of your tag but above all other layers.
28. Add your tube - Add a dropshadow and place to the left.
29. Copy and paste my provided word art and then type out your name in the font of your choice.
30. Add all copyright information and save as a .jpeg.


No comments:
Post a Comment