Smitten With You

Supplies Needed:
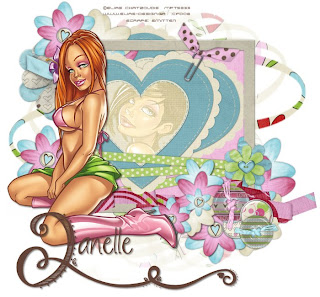
2 Tubes of choice. I am using the beautiful work of Elias Chatzoudis.
To use his work you must obtain a license from My PSP Tubes
Scrap Kit Smitten Kit Freebie from Tammy at Puuurfect Designs
Make sure you leave some love ~
Mask 228 from Vix's awesome site Vix PSP
Go to Goodies then click on Masks and then click to download masks 216-230
Font of choice.
I used TK Doodle which is a pay font.
You can get it at ScrapBook Graphics
1. Open all supplies in PSP
2. Open a 700x650 canvas (we will resize later) and flood fill white.
3. Open Smitten HeartFLower and resize by 17% Copy - Paste as new layer - Apply Mask - Merge group
4. Open Smitten Frame . Image - Resize by 25% - Copy - Paste as new layer.
5. Open Smitten Pink Solid paper and resize by 15% Copy - Paste as new layer - Move below frame layer. Grab your magic wand and click inside the frame layer. Selections - Modify - Expand 5 - Click O.k. - Selections - Invert - Delete paper layer.
6. Open Smitten Blue Heart and resize by 25% Copy - Paste as new layer. Grab your magic wand and click inside the center of the heart. Selections - Modify - Contract by 6.
7. Copy one of your tubes and paste as new layer. Selections - Invert - Delete tube layer - Add dropshadow - Change the blend mode to overlay.
8. X out all layer except heart layer and tube layer. Merge together the tube and heart layer. Duplicate your heart layer and free rotate right 30 degrees.
9. Open Paperclip Bow 1 and resize by 15% Copy - Paste as new layer - Image free rotate right 30 degrees. Delete pieces of the paper clip to make it look as though it's holding the two hearts together.
** See my tag for reference **
10. Once happy with the placement of your hearts and frame layer keep the background layer and mask layer x'd out and merge visible layers.
12. Add any embellishments of choice to your tag.
13. Add your main tube and apply a dropshadow.
14. X out your background layer and merge together visible layers.
15. Add name and © information
16. Un-X background layer and merge all layers.
17. Crop image to size and save as a .jpeg.


No comments:
Post a Comment