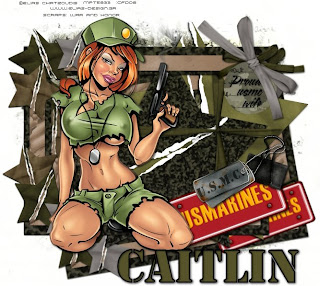
Camo Cutie
 Supplies Needed:
1 tube of choice. I am using the beautiful work of Elias Chatzoudis.
You have to purchase a license to use his work from HERE
War and Honor Scrap Kit from Element-By-Design.
Download the free kit from HERE
Mask of choice.
Font of choice.
I used Army which can be downloaded HERE
1. Open a 700x650 canvas (we will resize later) and flood fill white.
2. Open Camo Grunge Paper1 Image- Resize 20% - Copy - Paste as new layer
3. Apply your mask of choice to layer Right click mask layer - Merge - Merge group.
4. Open torn star 9 - Image - Resize 30% - Copy - Paste as new layer.
Add subtle dropshadow and move slightly to the left.
5. Open torn star 3 - Image - Resize 20% - Copy - Paste as new layer.
Add subtle dropshadow and place a littl to the right of star 9.
6. X out the background and mask layer. Layers - Merge - Merge Visible both star layers.
7. Open ribbon wrap 2 - Image - Resize 15% - Copy - Paste as new layer.
8. Place ribbon over merged star layer.
9. Click on your star layer to make it active. Selections - Select all - Float - Defloat - Invert. Click back on ribbon layer and hit your delete button.
(It should appear as though the stars are tied together)
10.X out background and mask layer. Merge together both the star and ribbon layer. Image - Mirror. Un - X all layers.
11.Open tagger extra - Copy - Paste as new layer - Resize 75%. Move under your star layer.
12.Duplicate tagger extra layer. Image - Rotate - Free Rotate - Left 15%. Move rotated frame layer below the original frame layer.
13. X out your background layer. Layers - Merge - Merge visible.
14.Un - X background layer.
15.Add any embellishments of your choice. Be creative.
16.Place your tube where it looks nice. Add dropshadow.
17.Add your name and any © information. Merge all layers.
18 Crop entire image and then save as a .jpeg


No comments:
Post a Comment