Bugle Boy
(when using my settings you have to click on the image to see the actual size)
Supplies Needed:
1 tube of choice. I am using the brilliant work of Scott Blair.To use his work you must obtain a license from My PSP Tubes
Scrap Kit Freebie: Independence by Lisa at Frosted Illusions
• Scroll down a bit and look for her Freebie Kit Section •
♥ Please don't forget to leave some love ♥
Mask 185 and 193 by Vix which you can download from VixPSP
My Template and Word Art included in my supplies.
Plug-In Filter Alien Skin Eye Candy Bevel (optional)
Fonts of choice.
I used Copperplate Gothic and Stephanie Marie
1. Open all supplies in PSP
2. Open a 700x650 canvas (we will resize later) and flood fill white.
3. Open Paper 5 - Copy - Paste as new layer - Apply Vix Mask 185 - Right click - Merge group.
4. Open Paper 6 - Copy - Paste as new layer - Apply Vix Mask 193 - Right click - Merge group.
• I duplicated this layer 2 times to make it a bit darker and to show above the blue mask layer •
5. On my Template select the Large Gray Square - Copy - Paste as new layer - Selections - Select all.
6. Open Paper 1 - Copy - Paste as new layer - Selections - Invert - Delete the paper layer - Selections - Select none - Delete the gray template square.
7. On my Template select the Tilted Gray Square - Copy - Paste as new layer - Selections - Select all.
8. Open Paper 3 - Copy - Paste as new layer - Selections - Invert - Delete the paper layer - Selections - Select none - Delete the tilted gray template square.
9. On my Template select the Star - Copy - Paste as new layer - Selections - Select all.
10. Open the Independence Preview (elements) - Copy - Paste as new layer - Duplicate until no black wording is in the star - Selections - Invert - Delete the paper layer - Selections - Select none - Delete the black star template layer.
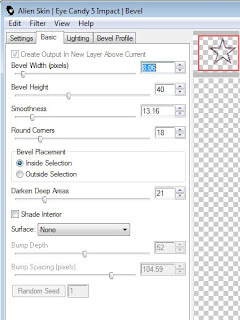
11. Apply the following settings using Eye Candy Bevel Plastic :

12. Copy and paste your tube to desired position. I also used the tube w/ background for inside the star.
• If you did what I did select inside the star with you magic wand - Selections - Modify - Expand by 5 - Selections - Invert - Delete tube layer - Move below star - Add subtle drop shadow to the star •
13. X out all layers and merge your tube and star together - Un • X all layers.
14. Open Frame 1 - Copy - Paste as new layer - Resize 70% smart size - Place above your template squares but below your star.
15. Move around the template squares until you have it looking as though they're a bit uneven - Grab your magic wand and select inside the frame square - Selections - Modify - Expand by 5 - Selections ivert - Delete any excess template square pieces sticking out.
16. Once happy merge your Frame & Template Squares together.
17. Now you can add embellishments of your choice and place them in your desired spots.
18. Open my Word Art - Copy - Paste as new layer - Duplicate. Move one below your frame layer and one above. Delete any wording on your top word art layer to make it look like the wording is going above and below your tag.
19. Once happy merge all layers except your background layer. Add your name and any © information needed.
Merge all layers and save as a .jpeg


No comments:
Post a Comment