Summer Chase

Supplies Needed:
3 tubes of choice. I am using the amazing work of Keith Garvey.
You have to obtain a license to use his work from MyPSPTubes
* I used tubes in which sunglasses were being worn *
Bright Me Out Scrap Kit by Scrappy Lover at Tantrum Scraps and also visit Maritza's awesome blog Scrappy Lover
* Thank you Maritza *
Tag Template 9 by the talented Yvette at Essence Of Creativity
Click on Links - Tag Templates - Go to Page 2 for download
* Thank you Yvette *
Xero Greyscaler Plug In ( optional )
Fonts of choice.
I am using SA-Kiss and Bank Gothic
1. Open all supplies in your PSP.
2. Open a 700x650 canvas (we will resize later) and flood fill white.
3. Copy and Paste the Dotted Line Layer from Yvette's Template as a new layer on your working canvas. Selections - Select All - Selections float - Selections - Modify - Smooth. ( Both Smoothing Amount and Corner Scale set at 10 - Anti Alias & Preserve Corners checked)
Open Cardboard Paper 1 - Copy - Paste as new layer - Selections - Invert - Delete Paper Layer. Selections - Select None - Delete Original Template Layer.
4. Copy the large circle from your Template and paste as new layer. Selections - Select All - Selections float - Selections - Modify - Smooth. Keep the same settings as used in step 3. Open BrightMeOut Paper 6 - Copy - Paste as new layer - Selections - Invert - Delete Paper Layer. Selections - Select None - Delete Original Template Layer.
5. Copy Large Photo Layer from your Template and paste as new layer. Move above all other layers. Selections - Select All - Selections float - Selections - Modify - Smooth. Open BrightMeOut Paper 4 - Copy - Paste as new layer - Selections - Invert - Delete Paper Layer. Selections - Select None - Delete Original Template Layer.
6. Copy Large Frame from your template layer and paste as new layer. Move above all other layers. Keep in it's original form.
7. Copy Small Photo layer from your template and paste as a new layer - Move slightly to the right. ( See my tag for reference ) Selections - Select All - Selections float - Selections - Modify - Smooth. Open Cardboard Paper 4 - Copy - Paste as new layer - Selections - Invert - Delete Paper Layer. Selections - Select None - Delete Original Template Layer.
8. Copy Small Frame layer and Paste as new layer. Move above all other layers and move over your small frames. Keep in it's original form.
9. Copy the small flower and paste as new layer. Selections - Select All - Selections float - Selections - Modify - Smooth. Open BrightMeOut Paper 3 - Image - Resize by 40% - Copy - Paste as new layer - Selections - Invert - Delete Paper Layer. Selections - Select None - Delete Original Template Layer.
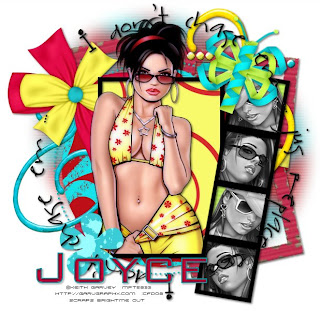
10. Open your 1st tube - Copy - Paste as new layer. Move below your small frame border but above the small frame layer. Place where it looks good whether you prefer it centered or a little off. Delete any of the excess that is in the following squares as we just want a head shot. On your tube layer apply the Xero Greyscaler Plug In using default settings. Continue to do the same steps for the 3 remaining small squares.
* Since I only used 2 different tubes here mirror the duplicated tubes *
11. Open your main tube - Copy - Paste as new layer. Move into your large photo layer but below the large photo frame layer. Delete the top portions of your frame so it isn't running across the forehead of your tube. Apply dropshadow of choice.
12. Copy BrightMeOut Frame 1 - Paste as new layer - move below all layers but above background layer.
13. X out your background layer and merge visible layer.
14. Un-X your background layer and add embellishments of your choosing. I also added the saying I don't chase em' ... jus replace em' around the tag.
15. Add your name and © information.
16. Merge all layers together - Crop to size - Save image as a .jpeg.


No comments:
Post a Comment