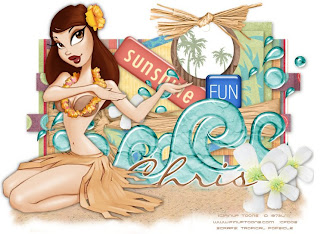
Hula Splash

Supplies Needed:
Tube of choice. I am using the amazing PinUp Toons.In order to use Rion Vernon's work you must obtain a license from CILM
Tropical Popsicle freebie Scrap Kit by Peppermint Creative.com
• If the kit is no longer available another kit with a beach theme will work •
Template by Me which you can download at Cupcake Sprinkles
Font of choice.
I am using Liorah BT
•This is a pay font so I am unable to supply it•
1. Open all supplies in PSP
2. Open a 700x650 canvas (we will resize later) and flood fill white.
3. On Template - Click on the large grey rectangle - Copy - Paste as new layer - Selections - Select all - Float - Defloat.
4. Open the Beach Towel Paper - Image - Resize 20% smart size - Copy - Paste as new layer. Click on your large rectangle layer - Selections - Invert - Delete your paper layer - Selections - Select none. Delete your original template rectangle.
5. On Template - Click on the large white rectangle - Copy - Paste as new layer - Selections - Select all - Float - Defloat.
6. Open the Creamsicle Paper - Image - Resize 20% smart size - Copy - Paste as new layer. Click on your large rectangle layer - Selections - Invert - Delete your paper layer - Selections - Select none. Delete your original template rectangle.
7. On Template - Click on the Black Lines - Copy - Paste as new layer - Selections - Select all - Float - Defloat.
8. Open the Sweet Spot Paper - Image - Resize 20% smart size - Copy - Paste as new layer. Click on your black lines layer - Selections - Invert - Delete your paper layer - Selections - Select none. Delete your original template rectangle.
9. On Template - Click on the Merged Black Rectangles - Copy - Paste as new layer - Selections - Select all - Float - Defloat.
10. Open the Limeade Paper - Image - Resize 20% smart size - Copy - Paste as new layer. Click on your merged black rectangle layer - Selections - Invert - Delete your paper layer - Selections - Select none. Delete your original template rectangles.
11. On Template - Click on the Merged White Rectangles - Copy - Paste as new layer - Selections - Select all - Float - Defloat.
12. Open the Palm Tree Paper - Image - Resize 20% smart size - Copy - Paste as new layer. Click on your merged black rectangle layer - Selections - Invert - Delete your paper layer - Selections - Select none. Delete your original template rectangles.
13. Apply a slight drop shadow on all layers except the large rectangle on the bottom and once you're done X out the background layer- Layers - Merge - Merge visible.
14. Un X your background layer.
15. On Template - Click on the Black Square Rotate layer - Copy - Paste as new layer - Selections - Select all - Float - Defloat.
16. Open the Blue Crush Paper - Image - Resize 15% smart size - Copy - Paste as new layer. Click on your black rectangle rotate layer - Selections - Invert - Delete your paper layer - Selections - Select none. Delete your original template rectangle.
17. On Template - Click on the White Square Rotate layer - Copy - Paste as new layer - Selections - Select all - Float - Defloat.
18. Open the Sun Burst Paper - Image - Resize 15% smart size - Copy - Paste as new layer. Click on your black rectangle rotate layer - Selections - Invert - Delete your paper layer - Selections - Select none. Delete your original template rectangle.
• We're finally finished with colorizing the template •
19. Open up the epoxywave from the embellishment folder. Copy - Paste as new layer - Image - Resize 25% smartsize. Move the wave to the lower right corner of the template. Once happy with the placement right click your wave layer - duplicate - Image - Resize 75% smart size and move behind the larger wave layer but staggered a bit so you can see all waves.
20. Open the splash right element - Copy - Paste as new layer - Image - Resize 25% smart size - Move to the lower right also.
21. Now that we've got the base of the tag nearly finished go ahead and add more embellishments of choosing.
22. Once your happy with how your tag looks X out all layers except your background layer and merge visible layers together.
23. Un X your back ground and now add your name and all proper © information.
24. After you've added all information merge all layers together and save as a jpeg.


No comments:
Post a Comment